If you read my construction log, you found that I built my engine from scratch. It is a Lycoming IO-540-D4A5, 260 HP engine assembled to new tolerances. When I put the engine together, I had no idea that I was doing anything out of the ordinary. Apparently, I was. Although many builders would like to assemble their own aircraft engine, not many do. I was asked by Ken Baker at Velocity to write an article about my experience. It was first presented in Velocity�s Online Newsletter in two parts. The complete story is posted below. Happy reading.
-- Andy
It Begins
No one could argue that the power plant is a very important part of airplane. The task of choosing an engine was a daunting one. I�m not a mechanic. I have a decent understanding of how a reciprocating engine is supposed to work. I have never rebuilt anything larger than a lawn mower engine. Now I have to come up with an engine that I will trust my life, and the lives of loved ones to. Where do I start?
There are a lot of ways to spend money and get something that will make noise and push the fan around. Automotive conversions, aircraft engines (including turbines), even engines like the DeltaHawk that holds promise for the future but is not here today. Discussing the pros and cons of each could start a fight and could be summed up in a nice sized novel. The one common factor with all of the choices is they are expensive.
My brother is a ASE Master Technician. He is of the automotive world. He can deliver to me a brand new V8 from GM, in the crate for $1,400. You might be able to buy a new cylinder for your airplane for $1,400. Ah, well, this comparison is for entertainment purposes only.
I am building an XL/FG. You could rightly draw from the FG that I�m conservative when it comes to my airplane. It shouldn�t be any surprise that I�m going with a Lycoming IO-540 260HP. It was the original engine installed on the XL by Velocity. The engine has a reputation as being highly reliable with a lower cost of ownership. I�m the guy that goes to the House of Flavors and gets Vanilla.
An aircraft engine is a bit of an enigma. Even the newest Lycoming engine is a refinement of something that was hot stuff back in 1935; decidedly low tech. We draw comfort from the history and say things like �tried and true� and �reliable.� I still drop my jaw when I hear that a new IO-540 from Lycoming is north of $45,000. A freshly overhauled IO-540 will be in the $20-$30K range and may require a core. I don�t have a core.
Let me be clear. I will not be cheap on this. Lives are depending on this. If I can�t do it right, I won�t do it. I will be frugal. I want the most value for my dollar.
A run out engine (core) can be had, with a little hunting, for $6-7K. It can be overhauled. You might want to budget $10-15K for the job. Could be more and it could be less.
The point I am getting to is this: An aircraft engine is just too expensive to make a buying mistake. I don�t have to look very far to find someone that bought an engine/aircraft with pedigree and papers only to find they had been taken. The cost of making things right can easily be in the tens of thousands of dollars. I cannot afford to buy a $20-30K engine and find out it is junk. I just can�t.
Building the Velocity is a learning experience. I mean this in the very best way. You can�t help but learn. It�s cool. I don�t know much about engines, and I would very much like to know about my aircraft engine. It can only make me a better pilot and owner. If I build my engine, I�m sure I�ll know how it works. This idea holds great appeal.
An aircraft engine is not an automotive engine. I can�t call my brother up and say �come over and let�s put this thing together.� To even think of putting an engine together, I need to have someone with a great deal of experience and a willingness to share and teach. I need someone willing to put up with a big ball of ignorance and enthusiasm. In my case, I need Terry Brokaw. Terry is a friend that I met through my local EAA Chapter. He is a Technical Counselor, A&P, ATP, VariEze builder, etc. Terry worked at G&N for years before he moved to Kalamazoo. He had been working on aircraft engines for a decade before I even knew I wanted to build an airplane.
Building my engine was not a plan. I would have been happy to find a great deal sitting on a pallet ready to run. Like most of us, I started looking at Trade-a-Plane, looking at ads, checking salvage, checking everywhere. I had time and I wanted to use it to my advantage. You can usually save money if you don�t need it tomorrow.
One fine day I found an ad on Barnstormers.com. Lycoming IO-540-C4B5/D4A5 kit, zero time, $12,500. Yep, they had my attention. I called. The gentleman was starting his own business. I was told his father runs a salvage yard and he gets the engines from him. His plan was to refurbish the engine. Send good parts. Some will be brand new, others will be used. It will be sold as a �kit� with all the parts shipped to me.
The �kit� will include all major components. The only thing I would need to buy would be common hardware which he estimated my cost to be about $75. I know you are going to ask, so, the engine was offered by Gary Barber, Outlaw Aircraft Engines, Plant City, Florida.
Not so fast. I asked for references. He had only sold one other �kit.� The one before me went for $10K. Hmmm� I found out later that the one after me went for $15K. I talked with the buyer. He sent pictures of what was delivered. He was putting the engine together and was happy as could be. He thought the parts were good. He had experience with aircraft engines, so I put some stock in it. The reference check was good.
 Terry Time. I got on the phone and explained the situation to Terry. He agreed the price was
great if the quality is there. We had a conference call. Terry agreed to negotiate on my behalf.
Terry�s only reservation was this �if we don�t like a part, we want to be able to send it back
and get a replacement without question.� Gary easily agreed. He wanted to make the sale and be
able to use me as a reference. His promise was �you�ll be happy.�
Terry Time. I got on the phone and explained the situation to Terry. He agreed the price was
great if the quality is there. We had a conference call. Terry agreed to negotiate on my behalf.
Terry�s only reservation was this �if we don�t like a part, we want to be able to send it back
and get a replacement without question.� Gary easily agreed. He wanted to make the sale and be
able to use me as a reference. His promise was �you�ll be happy.�I had Terry working on my side. I had what could be a great price. I had an eager seller. I decided to buy. Parts started arriving on my doorstep within a week. The case was in a Divco box and had a yellow tag. The crank was in a box from Aircraft Specialty Services and it had a yellow tag. The pistons and rings were brand new, in the box, from ECI, 1258 grams each. The rods were overhauled by Aircraft Specialty Services and they had a yellow tag. Things are looking pretty sweet.
The education begins when the parts start showing up. A couple of good questions come to mind: When will I have all the parts I need to make an engine? Are these good parts? Hmmmm�.
When will I have all the parts I need?
When taking on any sizeable endeavor, organization is the only way to keep you sane. At some point I had what I thought was a sizeable pile of engine parts. I invited Terry over to take a look.
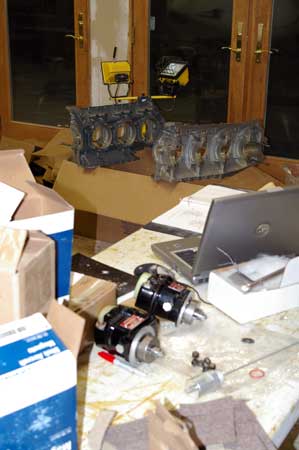 As he inspected the parts, it was becoming apparent that I had no way of telling what we had,
what was missing, or what action, if any, was needed. I felt I was wasting Terry�s time and
mine. I was never going to have an engine unless I could make sense of all this stuff.
As he inspected the parts, it was becoming apparent that I had no way of telling what we had,
what was missing, or what action, if any, was needed. I felt I was wasting Terry�s time and
mine. I was never going to have an engine unless I could make sense of all this stuff.Terry had graciously provided me with a CD containing .pdf versions of the Lycoming parts catalog for my engine along with all the ADs. I can be a little slow at times, and I really didn�t understand the significance of what he had given me. The light bulb eventually came on: I need to create a parts inventory!
I converted the .pdf into an Excel Spreadsheet (click to see). This turned out to be one of the best things I could have done. The Lycoming parts manual breaks the engine down into sub assemblies. I just copied their structure and had a worksheet for every subassembly. Each worksheet had the part number, description, quantity that I would need, and the quantity that I had on hand.
Excel had some nice features that allowed me to color code my �on hand� inventory. I colored the cell green when the quantity needed was equal to the quantity on hand. I used yellow for items with zero on hand, and red to note that I had at least one, but not ALL required. This kept me from just looking at a column of numbers and assuming that everything was there just because I had a number for each item. When an inventory page was complete, I turned the color of the worksheet tab to green as well. It took a couple hours to setup, and it brought order from the chaos.
Factoid: There are 1,301 individual parts in a Lycoming IO-540-D4A5.
With the spreadsheet, I could finally take inventory. I rounded up a bunch of boxes; one to correspond to each worksheet page. I labeled them to match. As I took inventory, I was able to put each part in its logical box.
After the first real inventory, I was able to break the inventory down further. I created a worksheet of what was missing as well as a worksheet for the common hardware (nuts, bolts, and washers).
The spreadsheet became the main document for organizing and tracking the project. When something came in, I updated the list. I carried it on my thumb drive so I always had it with me. If anyone asked for a part number, �just give me a sec.�
I bought a box of zip lock bags for small, loose parts. I wrote a label with the part number and quantity, stuck it on the bag; put the part(s) in the bag, and the bag in the correct box. Later, when it came time for engine assembly, I showed Terry my inventory system. He replied with a smile �Your organization makes me sick.�
Are these good parts?
Everyone wants a reliable engine. No one wants to pay more than they should for it. When I tell people that I�m building my engine, the universal comment is: �Do it right.�
It�s impossible to count the different aircraft engines and installations. The one thing that I would bet is each builder is sure his engine is good and his installation is right. I�m sure that if I could get representatives from the most reputable engine building shops together, they would invariably have differences in their approach and standards. Who is right? Who �does it right?� How do I get it right?
Here�s the deal and there is no way to get around it. I am the only person accountable for my engine. No one is going to crack my case and look over the parts before taking a ride. I don�t need approval to bolt whatever I want on the back of my plane. I could put a lawn mower engine on and the DAR will sign if off. Doing it right rests solely on my shoulders.
I can never forget that I will trust my life to this engine. I will trust this engine with the life of my lovely bride Theresa; very precious indeed. I�m sorry to be so serious, but � this is serious. I can guarantee that if I become a glider pilot at an inopportune time, that I would gladly pay everything I own, and ever will own, to not be in that situation.
A good engine is built with good parts. Being a novice, I start with the basic question: �what is a good part?� A great deal of education came in answering this question.
When I asked Terry to help me with the engine, he made one stipulation. The only way he would help was if I would do things his way. "What's your way?"
Terry said, "I�m going to build an engine that I will trust my life and my family's life to. If I don't like a part, it won't go in the engine. You can whine and you can cry. I'll even cry with you, but you're going to get me a new part. If you can live with that, I'll do it."
I wanted what Terry wanted and it was clear we both understood what was at stake. It was easy to say �yes.�
I came to find out that my engine supplier, Gary Barber, has a background in airboats. He deals exclusively in the IO-540 and has been building them for airboats for years. It was only recently that he wanted to venture into the experimental aircraft market. Eventually this caused some headache and heartache.
Many of the parts I received were brand new, or had a yellow tag. This was great. Unfortunately, not all of the parts were up to that standard. Some parts would work; to the extent that, yes, if you put the part on an IO-540, the engine would run. The major goal here is a safe, sound, strong engine. I need to know where I stand.
Terry noted that several parts came in boxes from Aircraft Specialty Services. He said they were a very reputable shop. They have the ability to check engine parts and can insure they are free from defects and meet the dimensional requirements set by Lycoming. When they check a part and it passes, they will give you a �yellow tag.� If it doesn�t pass, then I�m going to want another part.
It didn�t take long and I was good friends with Bob Merrell at Aircraft Specialty Services. On Terry�s order, I sent every internal steel part that didn�t already have a yellow tag in for inspection. Eventually I changed the delivery method with Gary. Everything was sent directly to Aircraft Specialty; if it checked out, they sent it to me. If not, please try again.
I can�t really say enough good things about Bob Merrell. The majority of their work is for certified aircraft and I was expecting to be treated as a novice small fry. Bob is an EAA member and holds a special place in his heart for the little guy. Without hesitation he took me under his wing and worked very closely with Terry and me to make this a good engine. Bob spent extra time explaining, educating, and giving very good tips on what to look for. I was well aware that he didn�t have to do this. It was humbling to have experts pulling for me and looking out to make sure nothing but the good stuff goes in my engine.
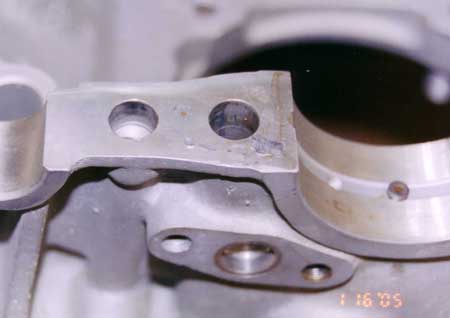
The crank case arrived in a Divco box; a reputable company. There was a yellow tag with it. Terry noted the yellow tag and said he still wanted to separate the halves and inspect it himself.
�But Terry, it has a yellow tag.� He looked at me with a �so...�
We seperated the halves.
It was a darn good thing too. Sometime after the last inspection, someone had pried the case apart using a screw driver. The faces had been galled in a couple places. Terry said �that has to be fixed� in a matter of fact manner. �And while you�re at it, have them cut the oil relief slots above the camshaft journals."
This was the first time Terry had saved my bacon and it wouldn�t be the last. It was also the first bump in the road with my engine supplier. He didn�t think the galling was a problem and wanted me to use it as is. I reminded him of his promise of �good parts� and he reluctantly agreed to get it repaired.
The extra level of parts scrutiny put a strain on my relationship with Gary. I might have been the first customer to demand this level of quality. It took over two years to get my parts from Gary; much longer than I could have imagined. A lot of time was spent rejecting parts and returning them. I got a deal on the dollars, but I paid for it in patience, headache, and heartache.
Just having a yellow tag wasn�t always enough. They still had to make it past Terry. He wanted the engine built to new tolerances. Parts came and he examined them like a father giving the evil eye to his daughter�s prom date. Imagine Terry examining any part and a balloon drawn over him � �What makes you think you are good enough to go in this engine?� Ha!
For example, the oil pump driveshaft was used, but it had a yellow tag. Terry asked for a new one. �We�re going for new and this might not make it to TBO.� These items were on me. I had been sent a good part, Terry wanted a better one.
Getting the engine parts together was not without humor. That oil pump drive shaft was $350 (about $100 per inch). Terry would put his arm around me and with a big grin tell me �Nothing is to good for Theresa.� It hurts, it hurts�
The cylinders were freshly overhauled and they looked great. Terry liked most of what he saw. For a new engine, we will need new exhaust valves. These are in pretty good shape, but they are not new. This is fine for a top-end overhaul. We�re building for zero time and � �Nothing is to good for Theresa.�
I soon found those valves are $165 each and I needed six of them. Ouch! I can�t complain � no one would listen. And, I�m the one doing this so I have no one else to blame. Oh, the pain. Ha!
Terry laughed with me, he cried with me, and he never lowered his standards.
Assembling the Engine
At some point, the inventory was looking pretty complete. Terry looked it over and decided we should start the build. The first decision to make was where to build it? I didn�t want to impose on Terry by having my engine taking up space in his shop. On the other hand, his tool box was a lot better equipped than mine. The added benefit would be that Terry wouldn�t have to spend time and money driving to and from my house. We decided to build it at Terry�s. Everything was packed into the Subaru and down it went.
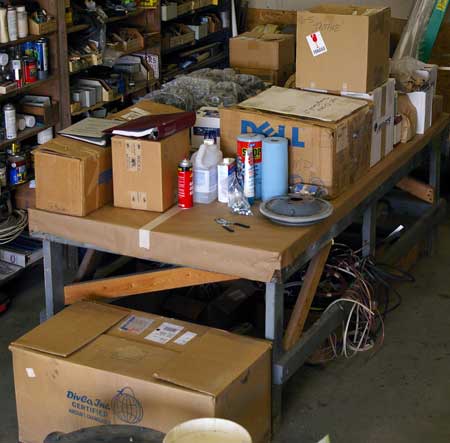
Terry cleared a 4�x8� table for the project. When all the boxes were in the shop, there wasn�t much room left on the table. It was neat, and organized.
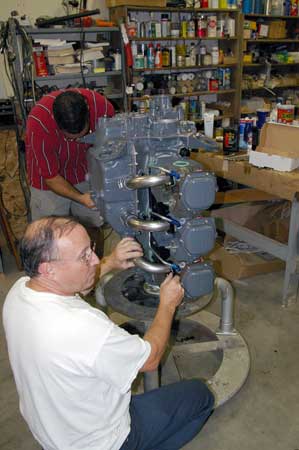
The first day of the build was a Saturday. I arrived bright and early, ready to turn wrenches. Terry happens to own a genuine aircraft engine stand. Job one was to bolt the crank on the stand. Next the crank gear went on. �Hey, parts are going together. Bolts are being turned; progress!�
Terry lives on an airpark with his beautifully restored 172. It happened that this Saturday our EAA Chapter, 221, was hosting a Young Eagles Rally at the Three Rivers Airport. We no more than got the Crank Gear on and Terry wanted to fly over to the rally and see how things were going. Now, I had been gathering parts for this sucker for over two years. I wanted to turn wrenches. But, what was another day? I smiled and said �sure� and we flew over.
We saw our friends, ate some hot dogs and were back at his shop in the early afternoon.
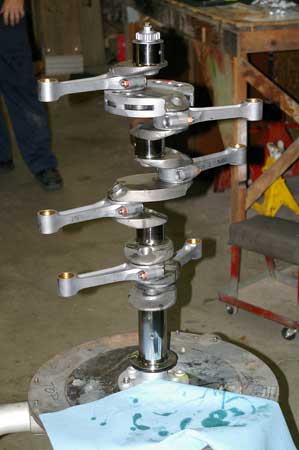
Ok, ready to turn wrenches. We got out the rods, bearings, nuts and bolts. It didn�t take long and our Steel Christmas Tree had grown branches. Next the counterweights came out. It took about two minutes to realize that one of the four snap rings in the bag was not right. It was too small. How did that happen? It doesn�t matter, it�s wrong. Just like that, we we�re done for today. Terry said �Call Bob, order the right one.�
Over time I came to find out just how Green I was. There was a reason Terry didn�t have a problem going to the fly-in. His experience told him there was no way we were going to put the engine together in one shot. It just doesn�t work that way. That being the case, he wanted a hot dog.
We built until we had to stop. Usually it was because we were missing a part, or the part we had was not the right one. Murphy laughed at me throughout this project. As a general rule, if Lycoming made two different versions of a part invariably, I had the wrong one. Terry knew this was going to go in fits and starts. He just didn�t have the heart to tell me.
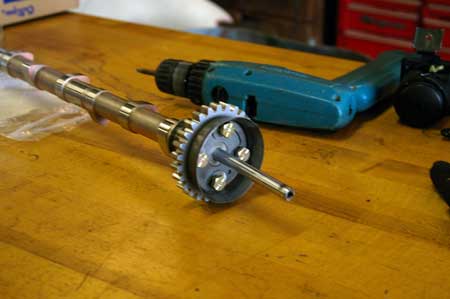 Camshaft with 71645 Slinger Ring (the cup shaped thing on the end)
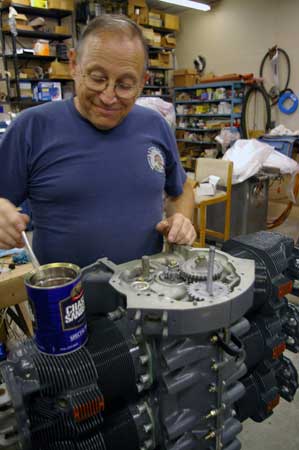
An interesting fact about Lycoming engines: the case halves are sealed using silk thread. Not a space-age polymer, just two pieces of silk thread and some #3 Permatex. I wanted to do as much of the assembly as I could. Terry was happy with this. He had a lawn chair, lemonade, and a whip.
When it came to installing the silk thread, Terry walked over and very deftly placed the shorter of the two pieces on the case. He pointed at it and said �do the other side just like that; then walked away.� Ok. I put the thread on and called the Sensei for inspection.
Do over Grasshopper...
We were making progress. We had the case halves bolted together and the cylinders were on. The visual progress was a real thrill. It came time to check valve train clearances.
We rotated the engine until a piston was at TDC. This insures both valves are closed. While pushing the rocker arm down, compressing the hydraulic lifter, we measured the clearance between the toe of the rocker and the valve cap. Based on the gap, the correct length pushrod is used to give the desired clearance.
This is one of those items that does not allow the small guy to have the entire inventory needed. The correct pushrod can only be determined as you build. I had 12 pushrods, just not the 12 pushrods we needed. Lycoming makes push rods in a variety of lengths. The 73434 is the shortest available for my engine. As it turned out, the engine was tight and we did not have enough of the 73434s. I had to come up with five more.
I got the pushrods. The good news was that three of the five valve trains were fine with a 73434. The bad news, two of the trains were too tight even with the 73434. Will this ever end? What do you do when you have all the right parts and it still doesn�t work? Why am I doing this? Arrrrggghhhhhh!
After conferring with my team of experts, the suggested course of action was to replace the valve seats on the offending valve trains. I�m trying to build an engine, not take it apart.
The cylinders were pulled. I spoke with Darrell at Harrison�s; another great guy in the aviation industry. Darrell offered to install the seats while I waited. Theresa and I drove them to La Porte, IN the next day.
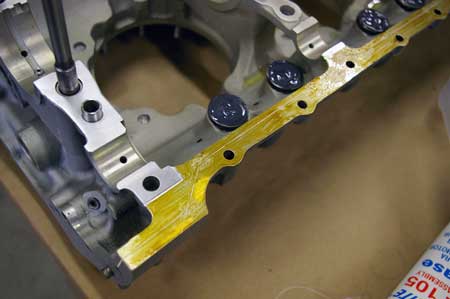
New exhaust valve seat installed by Harrison's
Terry has a good sense of humor, and is not beyond yanking my chain. I can see in his eyes that he is not trying to be funny. I am ready to throw up. Just to make extra sure, he decides to verify the piston is at TDC. He spun the engine feeling for TDC and took the gauge back to the valve. This time it cleared with ease. He looked back at me and smiled; �we�re in business.� Number 5 went the same. I didn�t know sweating bullets was going to be part of this.
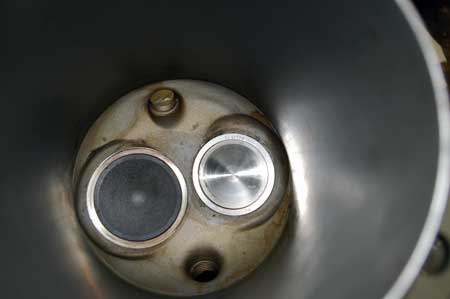
Valve clearance accomplished
The rest of the assembly went pretty fast
�I know� I replied. I told them I have Slick Mags.
He handed me the box; do-over. I found out the Aviall parts guy was sure I didn�t know what I was talking about and he corrected the order for me � yeah.
Dyno Run
Very early in the research process I had come across the concept of �testing the engine while testing the airframe.� Several people and some well written articles suggested that this situation is best avoided, if possible. I understand complex systems enough to know that limiting the number of variables can really help keep things under control.
At the time my impression of a Dyno run was something that hot rod builders do. After tweaking their engine, they want to know if the change had the desired result. I also have friends that want the dyno run for bragging rights. �We can get 10 gozillion HP at insane RPM. We expect to get 10% more when we install the chrome muffler bearings...� I had never thought of it as a simple verification tool; is it working correctly?
When I asked Terry what he thought, he immediately said �It�s a good idea.� G&N is located about two hours from us and they have an aircraft engine dyno. Actually, they have two.
I spoke with G&N at OSH about the dyno run. They said they dyno every engine they build. They have come to believe there are just too many benefits to not to do it. They can verify the engine was assembled correctly. If there is a problem they will find it on the ground, not in the air. If there is a problem, the engine is in the shop where it can be taken care of. They can control the break in process. The first start is critical and they want it was done right.
When the engine was ready, I called G&N to schedule an appointment. A dyno run takes the better part of a day. They want the engine in their shop at least a day in advance. This allows them to get it hooked up in the test cell the day before. Of course we wanted to be there when it was started. The problem was, their dyno schedule depends on a lot of variables and they could only give me a possible window. The best we could hope for is a phone call in the afternoon saying the engine was going to run tomorrow morning.
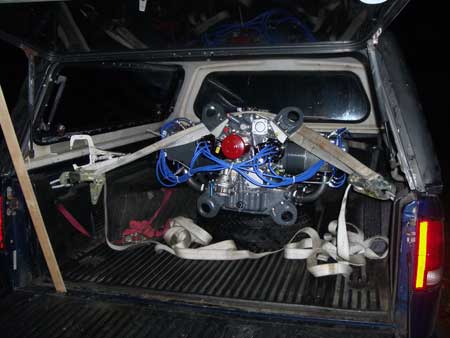
Engine loaded in Terry's Truck
We took the engine down on a Tuesday. On Wednesday I received the call. We arrived right on time for the start Thursday morning. When we walked in we were told Carl, our dyno tech, had a bit of a family emergency and needed to leave early. For that reason he had already started the engine and was an hour into the run. I was disappointed as we walked over; I really wanted to see the first start. That lasted long enough to see and hear my engine running. I just don�t have the right words to describe how thrilled I was.
Dyno Run Movie on YouTube
G&N does not hook a computer monitor to the engine. At one time they did. They found it added more time to the process, but didn�t give them any more useful information. They don�t build high performance, custom engines. If all goes according to plan, they get a very stock engine; exactly what I was trying to do.
The engine ran well, very well. On the final run a horsepower reading was taken. According to Carl, my engine preformed exactly as he hoped and expected it would. Our power was right in the range they expect from their own engines. He looked me in the eye and said I should be very happy. �You have a good engine there.�
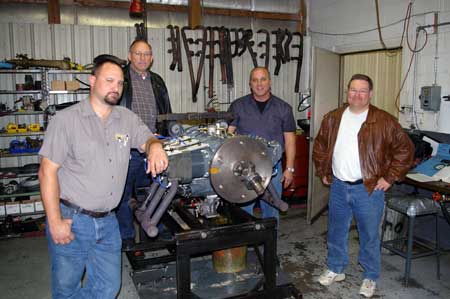
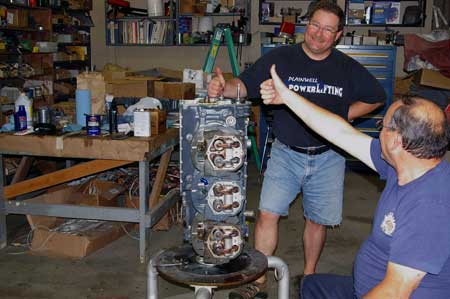
Dyno Team after the successful run
Would you do it again?
Yep, I would. I made mistakes. Sometimes it was frustrating. It took longer than I thought it would. The upside is that I have a great engine. I got it for a good price, not a great price, but a good one. Most importantly, I learned a lot. I know my engine and I think that�s awesome.
What would you do differently?
I bought the engine from a guy that was putting together an engine �kit.� I don�t recommend this unless you are working with a very professional business that has a sterling reputation. My engine wasn�t an engine until I put it together. Before that, it was just a collection of parts that didn�t know each other.
If I had purchased an engine to overhaul, at a minimum I would have known I had all the right parts; worn out, but there. An example of the problem was the tach shaft. I received a tach shaft with the engine. It looked like the picture in the Lycoming parts manual. We didn�t learn it was the wrong tach shaft until we went to install it. A great deal of time was spent finding the correct parts. If I had taken the engine apart, I would have the old part to send in. If it didn�t meet spec, I could say �get me a new one� and they would have the old one in hand for comparison.
To anyone wanting to do this, I would recommend buying a core from a reputable place and overhaul it.
What did it cost you?
The engine kit was $12,500. I put another $4,000 into new parts, and at least another $1000 in machining, shipping, and fees. The dyno run added another $600. All in, I have around $18,000 invested.
The $75 in hardware, Gary had claimed when I bought the engine, turned out to be closer to $1000. Gary didn't tell me that cylinder base nuts for a narrow deck IO-540 are VERY expensive. There are 24, 1/2" nuts and 24, 3/8" nuts. The 1/2" nuts are $23 each and the 3/8" nuts are $19 each. I didn't know, what I didn't know
I have to say there was more to the cost than money. It took two years to get �most� of the parts. I never did receive everything I was due. What I might have saved in dollars, I paid for with headache and heartache. To a large extent, this was my own doing. I decided to take this path. I bought this engine.
What did you learn?
- I wanted to learn how my engine worked and how it was put together. Mission accomplished.
- I wanted to know what I had when I was done. Mission accomplished.
- I found great resources that will be invaluable as I maintain my engine.
- I wanted the experience of putting together my own engine. I wanted to look at it and say to myself �I did that.� There is no dollar value for this.
- Even more than usual, you don�t know what you don�t know! The process does not suffer ignorance well. Do the homework. Patience and attention to detail are greatly rewarded.
An engine from Lycoming does not know it is certified. My engine does not know it is not certified. A bolt that Lycoming buys from a supplier does not instantly become stronger when they re-sell it to me with their part number. Just because a hardware store grade three bolt meets a superficial spec. doesn�t mean I should use it. It is the responsibility of the builder and owner to know they are using good parts, tools, and information. Putting an engine together will present many choices. You need to choose wisely.
Since I had never put an engine like this together, I was apprehensive. I wanted to �Do it Right.�
Doing it right can and does mean a lot of things.
- Use good parts that meet or exceed specification
- Use the manufacturer�s documentation and make sure ADs are complied with
- Don�t fudge when it comes to tolerances
- If it doesn�t look good, then it probably isn�t
- If you don�t know, you gotta find out!
Mostly, I found that doing it right was a state of mind, a method that is only born out in the results. In my way of thinking �Done right, runs right.� And that will be proven as the engine serves and is maintained.
One last thing
The Man Terry Brokaw. I can't thank him enough
During the run I was talking with Carl. I mentioned the comment and said I thought the guy was trying to be nice. He said �No, he knew.� He went on to say he also knew.
You see, over the years, they have seen a lot of engines; good and bad. If you know what you are looking for, quality is as plain as day. He listed several items he saw on my engine: seeing the stubs of the silk thread sticking out of the end of the case, seeing a little extra #3 Permatex on the seams, the cylinder base lock plates had been primed, but had a very thin coat, etc. To someone �who knows,� it was clear that this engine was assembled by someone �who knows how.� Done right, runs right � and it did.
This comment says a great deal about Terry Brokaw. I get no credit other than being smart enough and lucky enough to have him as friend and mentor. Thanks Terry!
Back to the Top